RSS

Transmission – Script after download

Hi there,

This post is going to show you how to enable a feature of transmission, which can run a script after a torrent was completed successfully. This may be usefull when you want to move the files to a share, or allow someone using a share to modify the downloaded files without any knowledge of the debian-transmission user and password.

In order to configure this we have to stop the transmission daemon with the following command.

/etc/init.d/transmission-daemon stop

After this I have created a folder called scripts to my root folder with the following command.

mkdir ~/Scripts

Then created the script which has to be run after each completed download.

touch ~/Scripts/AfterDL.sh

I have given it the right to be executable with this command.

chmod +x ~/Scripts/AfterDL.sh

Added these lines into the file.

#!/bin/bash

filename=$(transmission-remote -n <username>:<password> `
–list |grep Idle | `
awk ‘{ for(i=10; i<NF; i++) printf “%s”,$i OFS; if(NF) printf “%s”,$NF; printf ORS}’)
fullpath=/home/pi/Downloads/$filename

sudo chgrp -R pi “$fullpath”
sudo chown -R pi “$fullpath”

The first line tells the interpreter to use Bourne Again Shell, The second line retrieves the finished torrents name from the cli of transmission. The third line creates the full path to the file. The fourth line is changing the group of the file recursively in case its a directory, the last line changes the owner of the file.

There are only 2 things to do before we can say start using it. The first is to modify the owner and group of the AfterDL.sh script so that debian-transmission can use it.

chown debian-transmission ~/Scripts/AfterDL.sh
chgrp debian-transmission ~/Scrtips/AfterDL.sh

The last thing of course is to modify the settings file of transmission. This is located here.

/etc/transmission-daemon/settings.json

In here there are only 2 lines to be modified.

“script-torrent-done-enabled”: true,
“script-torrent-done-filename”: “/home/pi/Scripts/AfterDL.sh”,

The first line specifies the status of it, the second is the location of the scritps. There maybe cases when debian-transmission has no rights to use the “sudo”command and this can be worked around by editing the /etc/sudoers file adding the following.

debian-transmission ALL=(ALL) NOPASSWD: ALL

Now all we have to do is start the daemon.

/etc/init.d/transmission-daemon start

Once our newly added torrent finishes it will be visible that the owner and group has changed by issuing the “ls -l” command in our Downloads directory.

I hope this has been informative to you 🙂

Cheers,
Daniel

 
Leave a comment

Posted by on April 9, 2016 in Uncategorized


Raspberry Pi Model B – Ad-Hoc setup (TL-WN725N)

Hi there,

I have been really busy lately… I’m preparing for my state exam to finish my university studies, which will close a quite big and dark chapter of my life.

In my spare time I’m preparing my Pi for a DIY RC car which will be controlled via WIFI. In order for me to pull this off I need to make connection in Ad-Hoc mode to my Pi. I have a TP-Link nano usb based wifi module (v2). This module for some reason won’t work in this mode with the default hostapd package coming from the official Jessie repositories. So I had to spend some hours digging the net for the proper solution. I was about to abaddon my project and buy a bluetooth dongle when I found this amazing blog.

https://jenssegers.com/43/realtek-rtl8188-based-access-point-on-raspberry-pi

This helped me a lot, so basically I had to follow the steps described in there. I do not want to claim any glory for relaying the knowledge found there. So what I did was the following.

I have removed the already installed package, this switch of dpkg is like an atomic bomb 🙂 it cleans every trace of the package.

dpkg –purge hostapd

Then I entered the following commands in order.

wget https://github.com/jenssegers/RTL8188-hostapd/archive/v2.0.tar.gz
tar -zxvf v2.0.tar.gz
cd RTL8188-hostapd-2.0/hostapd

make
make install

What the above did is simple. It pulled the package of the custom hostapd from github, then extraced it, and compiled the package and installed it into the default path’s.

After this all I had to do is configure the hostapd, and install a DHCP server on my Pi. I have used the dnsmasq as DHCP server, it was fairly simple. So I installed the package with the following command.

apt-get install dnsmasq

Then I configured the two packages. The first one was the hostapd’s config file which is located here: /etc/hostapd/hostapd.conf, by default it contains the following.

# Basic configuration

interface=wlan0
ssid=<your ssid goes here>
channel=1
#bridge=br0

# WPA and WPA2 configuration

macaddr_acl=0
auth_algs=1
ignore_broadcast_ssid=0
wpa=3
wpa_passphrase=<your password goes here>
wpa_key_mgmt=WPA-PSK
wpa_pairwise=TKIP
rsn_pairwise=CCMP

# Hardware configuration

driver=rtl871xdrv
ieee80211n=1
hw_mode=g
device_name=RTL8192CU
manufacturer=Realtek

All I had to do is replace the password and ssid lines with my choice. Then I configured the dnsmas package which has a configuratio file here: /etc/dnsmasq.conf, it has many lines by default so I will only pick the ones which are relevant now.

interface=wlan0
dhcp-range=10.0.0.2,10.0.0.200,255.0.0.0,12h

These 2 lines told my software that Pi only likes to server DHCP requests on the wlan0 interface, and the range must be starting from 10.0.0.2 to 10.0.0.200 with an A Class subnetmask, for 12 hours per lease.

Finally I added both services to start at boot time and I was almost ready to go, I had to add a static IP address to my wlan0 interface with the config file: /etc/network/interfaces

auto wlan0
iface wlan0 inet static
address 10.0.0.1
netmask 255.0.0.0

This is how I made sure the services are starting up at the boot.

update-rc.d hostapd defaults
update-rc.d dnsmasq defaults

Finally I rebooted my Pi and I was able to connect to the network with the specified parameters.

Cheers,
Daniel

 
Leave a comment

Posted by on January 16, 2016 in Uncategorized


Raspberry Pi Model B – rpimonitor & shellinabox

Welcome Wanderer,

As promised in the last post I will show you how to setup “shellinabox” and additionall the “rpimonitor” packages. The latter I have found recently reading Raspberry tutorials. I have found this cool blog with many-many interessting topics, please feel free to visit.

http://rpi-experiences.blogspot.fr/p/rpi-monitor.html

There are many other topics however the rpimonitor has got my attention at first sight. In a nutshell this package provides a decent web interface for the Pi where we can see many information from Temperature, to SD utilization, CPU status, Memory status. Whats even better is the ability which is provided to write our own plugins to the webpage so that we can see custom information about our Pi, for example my Raspberry is connecting to the network via WIFI card, so I will replace the default Eth0 status with the Wlan0 status. Below are the commands to add the repository and the keys to the Pi and get the ability to install the package. Other way is to get the “.deb” package and install the dependencies manually 1 by 1, but for me this was more convenient.

apt-get install apt-transport-https ca-certificates
apt-key adv –recv-keys –keyserver keyserver.ubuntu.com 2C0D3C0F
wget http://goo.gl/rsel0F -O  /etc/apt/sources.list.d/rpimonitor.list
apt-get update 
apt-get install rpimonitor
/usr/share/rpimonitor/scripts/updatePackagesStatus.pl

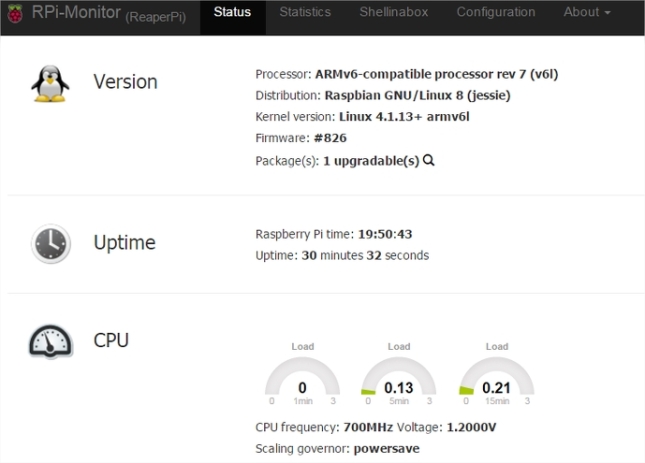
After this is done we are ready to check the site by default! We should visit the site http://<RaspberryPIIP>:8888/status.html and see the following!

PrtScr capture

After clicking the “Start” it get’s to the start page of the Monitoring site.

RPi-Monitor (ReaperPi) - Google Chrome_2

I think this is pretty cool, we a good port-forwarding setup on our Router it is possible to check the Pi from anywhere around the world.

The next package is the “shellinabox“, which is a https based utility enabling the management of the Pi from the browser (except IE 😦 ). To install this package all we have to do is give the command.

apt-get install shellinabox

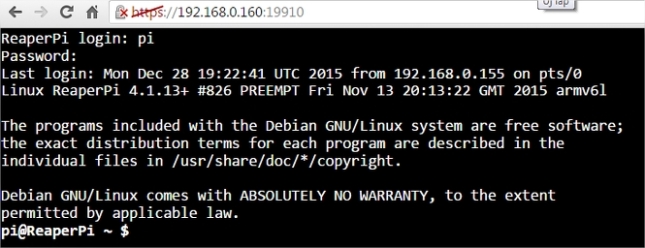
After the package is installed,  I went to replace the default port to the port: 19910, it’s just security precaution, and it will be replaced after this post was publised :). So I edited the “/etc/default/shellinabox” file’s line which starts with the  following: “SHELLINABOX_PORT=19910” and specified my new port. Then I restarted the service with the following command: “/etc/init.d/shellinabox restart“. From now on I can visit the Pi via the web interface to configure it from a browser. I went to the following link in my browser: https://<RaspberryPIIP>:19910/ and this welcomed me.

pi@ReaperPi ~ - Shell In A Box - Google Chrome

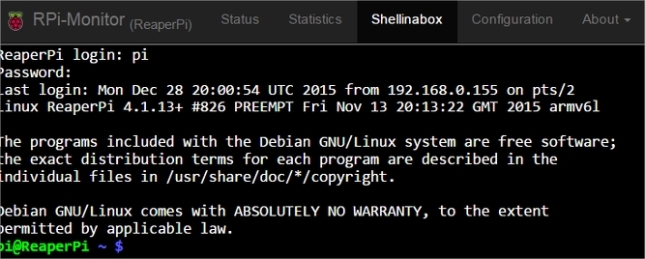
So now I should set 2 port forwarding on my router, and I will be able to configure my Pi and check it’s health status aswell from anywhere. But hold on for a second, it get’s even better. The previously installed package is able to use shellinabox as a plugin, so we only have to configure it so it can reuse this tool. All that need to be done is to edit the last line of this configuration file: “/etc/rpimonitor/daemon.conf” and restart the daemon of the monitor. In my case the last line contains the following: “daemon.shellinabox=https://127.0.0.1:19910/” it tells that the daemon is listening locally on the 19910 port. Now if I go under the “Shellinabox” menu on the “RpiMonitor” site I see the following.

RPi-Monitor (ReaperPi) - Google Chrome_3

It’s burrowed under the nice and shiny monitoring interface, so I have complete supervision above my Pi in one place. I’m really happy for this new package. Now I’m going to add my WiFi interface’s status to the site. All I have to do is go and edit the “/etc/rpimonitor/data.conf” file. Where I remove the “#” from this line:

include=/etc/rpimonitor/template/wlan.conf

and add the “#” to this line:

include=/etc/rpimonitor/template/network.conf

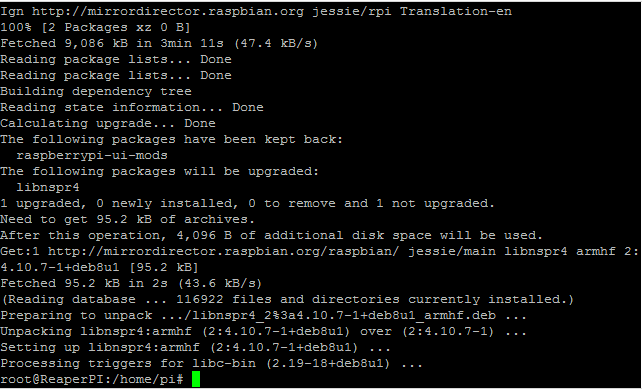
After this I restart the daemon and go to the site. Now I can see my new entry on the site, and the status of the WiFi traffic.

RPi-Monitor (ReaperPi) - Google Chrome_4

Well this was all for now, I plan on playing with this cool package later in time. Thanks for reading.

Cheers,
Daniel


3 Comments

Posted by on December 28, 2015 in Uncategorized


Raspberry Pi Model B – Wifi setup

Welcome stranger,

This time I picked up my long forgotten Raspberry Pi which I bought more than 2 years ago, it was dusty but It started up without any hiccups. I just bought a WIFI. Despite it’s age this little machine packs a really good punch.

rpi

It has the following specs:

  1. CPU as BCM2708 alias ARMv6
  2. 512 MB memory split between GPU and CPU
  3. 26 pin GPIO socket
  4. 1 Ethernet port 10/100 Mbps
  5. HDMI output
  6. S-Video and Analog output

I have created the image necessary for it to come alive with the Win32Imagewriter tool. I downloaded the image from the official Raspberry site, and created it on the 8GB  Micro USB I have.

I have after it has completed I plugged together this beast with my monitor and keyboard and it booted like charm. I prefer the console overt the GUI, it’s more convenient to use.

First I have made sure to update the Pi to the latest and greatest version with the following commands. It’s a best practice to have the latest stable version of anything we want to configure.

sudo apt-get update && sudo apt-get upgrade -y

rpi2

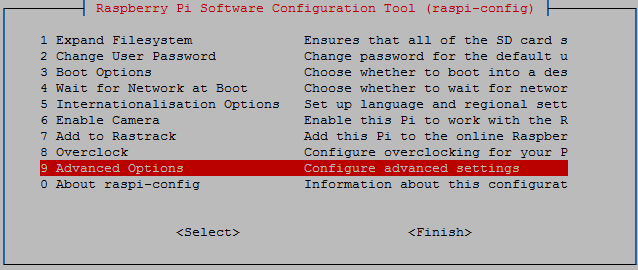
The part before the “&&” will sync the cache with the originally configured repositories and check for newer packages and even download them. The second part will upgrade these packages without asking for confirmation, this is the point of the “-y” switch. So once it was ready I have enabled the SSH and went to use the “Putty” as my tool for the remote access of the Pi. To enable SSH we have to do the following. In the console write “sudo raspi-config” this will bring up our configuration menu for the Pi.

rpi3

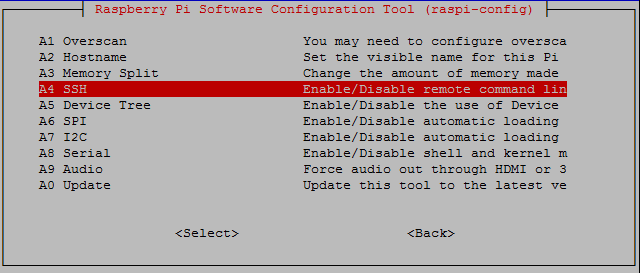
The we go to the “Advanced Options”, and select the “A4 SSH” option.

rpi4

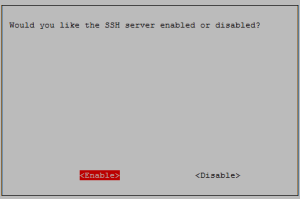
Then we select the “Enable” and v’oila the Pi is reachable via SSH.

rpi5

In my home we have 2 WIFI sources the firt is an Open network, the other is a WPA-PSK protected network. In order to enable the WIFI to connect we have to configure the networks in the configuration file. I have shut down the Pi and plugged in the TPLINK(WN725N) WIFI module I bought. The Pi must be powered off because the plugging in of a USB device will result in a Spike in the power distribution which will result in an unexpected reboot. After my Pi booted up I ran the following command.

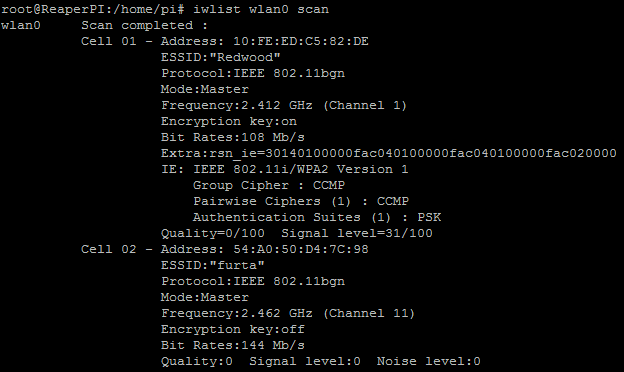
iwlist wlan0 scan

The “iwlist” is the tool which drives the WIFI hardvare, the “wlan0” is the ID of my WIFI module, the “scan” command will search for visible networks. In my case it resulted in this output.

rpi6

After this I knew with what to edit the configuration file necessary for my wifi connections. The file is at the following location.

/etc/wpa_supplicant/wpa_supplicant.conf

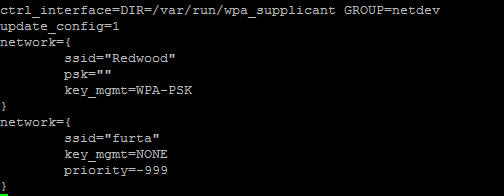
The first 2 lines are give, the rest is what I had to add.

rpi7

The first network is the protected, I have intentionally removed the password from the file. The second one is the open network. Notice the “priority” line which is present at the second network. This means that it will only use the not protected network if the protected is unavailable. In order for these changes to be applied and the connection to be made possible it is necessary for the Pi to reboot. After reboot I can see that my Pi is connected to the protected network and the wifi interface has recieved it’s IP Address.

ifconfig wlan0

pri8

The above is the command which shows us the status of the interface. In case the above did not work, the following file must be edited.

/etc/network/interfaces

Here, one can add the following lines which ensure the DHCP configuration of the interface and the usage of the proper configuration file.

auto wlan0
allow-hotplug wlan0
iface wlan0 inet manual
wpa-roam /etc/wpa_supplicant/wpa_supplicant.conf
iface default inet dhcp

Now I can put the Pi anywhere in my home 🙂 as long as there is WIFI signal the Pi will stay reachable because in case the connection to one network is lost the Pi will automatically connect to the other reachable one.

That was all for now, next feature to be configured is the “Shellinabox”

Cheers,
Daniel

 
Leave a comment

Posted by on November 26, 2015 in Uncategorized


Ubuntu Server 14.04.3 LTS SSH access

Hello,

This time I’m diving into some linux, I have downloaded the latest and greatest Server edition of Ubuntu. I have installed it with the defaults, given him 2vCPU and 1 GB RAM, and a 20GB vmdk, which will suffice. The first thing that got me was the smoothness and speed I was able to install it from zero. This is needed because I wanted to get familiar with Graylog2 this is a log collector, with some extra features, and a very modular philosophy behind it. Befor I start describing it I need some prerequisites to be done.

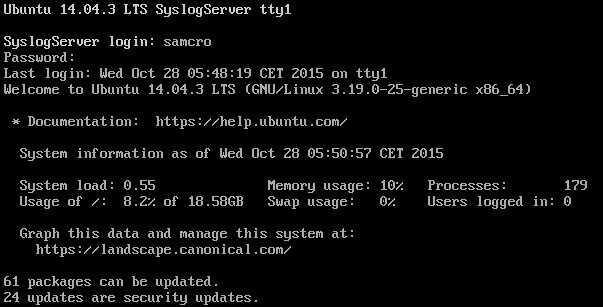
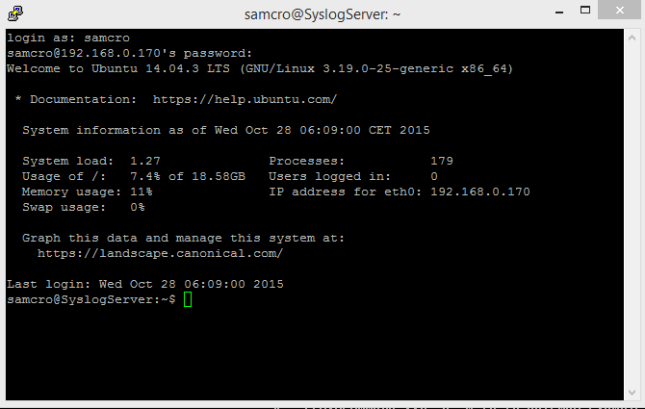
I have to update the server to the latest patchlevel. When I first login to the server I got this message.

plvl

I have to type “sudo su“, give my “root” passwod, and then initiate the update with “apt-get update && apt-get upgrade -y” command.
The “&&” is the linux way of chaining commands, the first one searches for updates, the second one installs them automatically  the “-y” switch means ‘I Accept’.

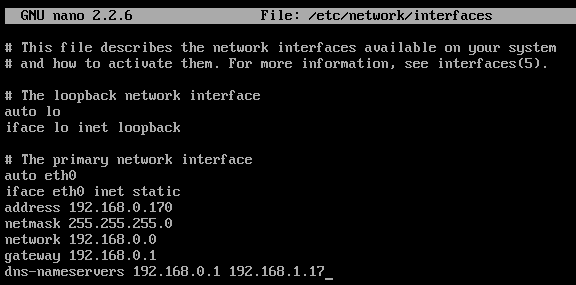
After this I need to setup the SSH accesss because I do not want to use the VMWare console. For this I need a static IP address, or a way to resolve the name of my Virtual Machine, I choose the static IP address. I need to edit the “/etc/network/interfaces” file, which holds the configuration for the recognized network adapters. We can use any command line text editor, I prefer “nano” which is pretty easy to learn and use. I type “nano /etc/network/interfaces“, this is the default.

int_before

This should be the after because I choose the address space of my first router, which connects to another router.

int_after

This is how it looks after, let’s reboot the system with the “shutdown -r 0”, because it’s still pending after the update installation.
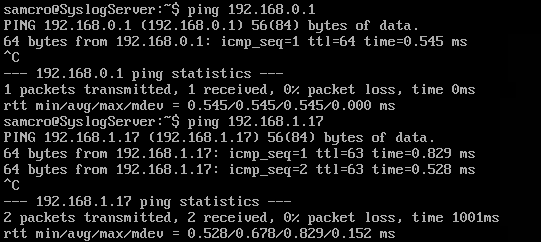
After the server is back again I must be able to “ping” my 2 DNS servers, which are both routers.

ping

Everything seems to be fine, now let’s make our server reachable via SSH. For this we need the use the following command
sudo apt-get install openssh-server -y” which will ask for the password to install this package. If we want we can finetune the SSH with this configuration file “/etc/ssh/ssh_config” but the default will suffice. Now let’s use putty to reach the server. At first it prompt’s us to accept the signature, then asks us for our password.

ssh

 
Leave a comment

Posted by on October 28, 2015 in Uncategorized


Adding Active Directory groups as a Member to a Local Group of a Machine

Hello,

This post is about managing groups on a remote/local machine and the means to achieve it. I will not go into depths or explaining what is an Active Directory / Local Group. From our perspective it is fair enough to say that it is like a container, which helps us to group identities with the same purpose. Let’s say we want to grant access to the HelpDesk people in our organization to any client machine we have. We either add them locally to the necessary group(Remote Desktop Access / Administrators), or create a group and use it. For example if we have 1-2 users it’s not that big work, but if we have ~100 people and ~2000 machines it grows exponentially. For this purpose we could create a group, for example “HD People” in our Active Directory. After this we have to add the members to this group. Then we only have to add this group to the client machine and whenever a new member arrives to the group, it is automagically able to access the same machines do the same stuff as other members because he/she is a member of a group.

So to get back to this topic where we originated from, we have 3 options to use:

  1. GUI, which means the appropriate mmc snapin
  2. net localgroup <group name> <groupname/username to be added>, which is a legacy cmd tool
  3. [ADSI] typeaccelerator, which means we can use powershell and build some awesome script onto it.

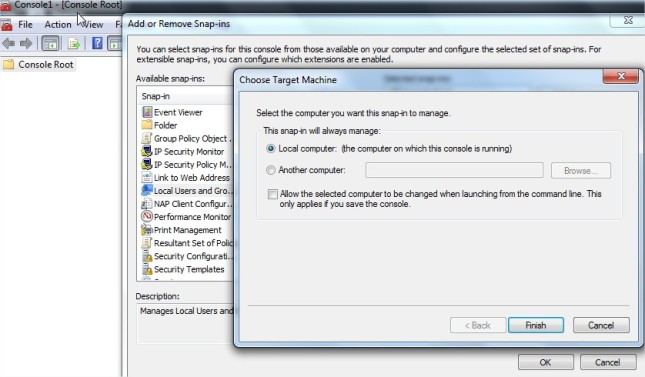
The GUI version is pretty straightforward, we start the MMC. We go to add snapin, select either the local machine or a remote machine where we have access to and then ADD the “Local Users and Groups”.

PrtScr capture

The “net localgroup” command requires either the “cmd” or the “powershell” tools to be able to be used. There are 2 problems with this approach, the first is that the command has no remoting feature, which means it can only be ran locally. The other maybe the biggest problem is that it can only add groupnames which are less or equal than 20 characters.

PrtScr capture_2

Link:https://support.microsoft.com/en-us/kb/324639

The last one is the ADSI feature which comes from the .NET.

$Computer = “localhost”
$LocalGroupOfMachine = “Administrators”
$GroupToBeAdded = “Domain Group to be added”
$Group = [ADSI]”WinNT://$Computer/$LocalGroupOfMachine,group”
$Group.add(“WinNT://$($DomainOfGroupsToBeAdded)/$($GroupToBeAdded),group”)

The $Computer variable holds the name of the machine where we want to modify the localgroup, the $LocalGroupOfMachine holds the group’s name where we either add or remove the specified group.

PrtScr capture_3

Hope this will spare some time for others! If I had know these techniques before…

Cheers,
Daniel


Leave a comment

Posted by on October 19, 2015 in Uncategorized


PowershellWebAccess in a mini Domain

Hello, long time no posts due to heavy load at work. However today I took the time to summarize my newest achievement. I have managed to understand and configure the PSWA in a virtual environment which consists of 4 machines, the host, 1 DC and 2 client machines. The host is Windows 8.1, the DC and the clients are all 2012 R2 DC preview OS-es.

My host recieves IP from local router and it’s via DHCP not static assignment,

The Virtual Machines have the following IP layout.

ReaperDome:
     IP: 192.168.0.150 /24
     GW: 192.168.0.1
     DNS: 192.168.0.150

Node-A:
     IP: 192.168.0.160 /24
     GW: 192.168.0.1
     DNS: 192.168.0.1

Node-B:
     IP: 192.168.0.170 /24
     GW: 192.168.0.1
     DNS: 192.168.0.150

The name of the domain is “ReaperRealm.com” and the idea is that the Domain Controller serves as a gateway for the PowershellWA.

The first is to install the feature onto the domain controller:

Install-WindowsFeature –Name WindowsPowerShellWebAccess -IncludeManagementTools -Restart

After it was ready the machine needs an initial configuration, which is simple. At first step I have to insall the Web Application which will be the host of the Powershell.

Install-PswaWebApplication -UseTestCertificate

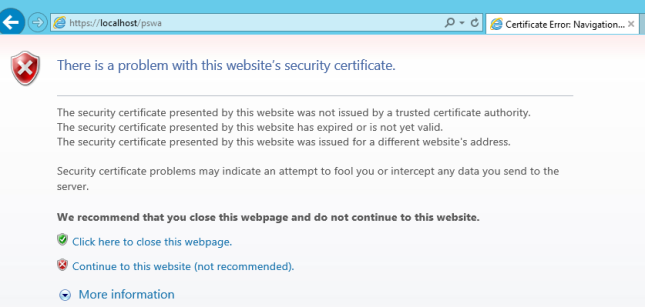
The “-UseTestCertificate” is only safe in a test environment because it will generate a certificate and sign it for itself which is not safe in productive environment, but in VMware workstation everything is allowed. 🙂 Now if we go to this site on our DC with the browser:
https://localhost/pswa” we should see the following appear.

sscert

This is a sign that we are good at what so far has been acheved, and that the self signed certificate gets suspicious even for the Internet Explorer. 😀 After the continue we should see the following.

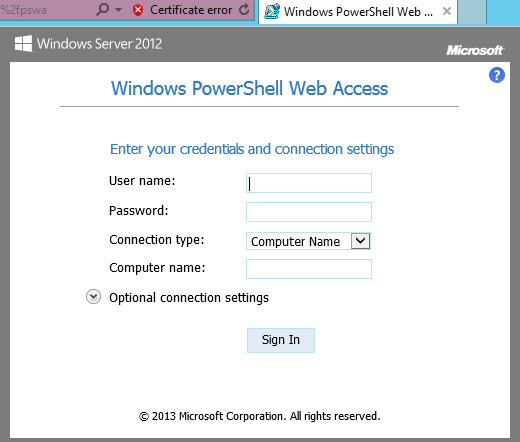
pswa1

Here we have to specify the username/password for the computer which we want to create a powershell session to. This is tricky because for this to be achieved we have 2 things to configure. The first one is the authorization rule, the second one is the user’s access which we use to enter the powershell’s realm via browser. The laziest authorization is as follows.

 Add-PswaAuthorizationRule –UserName * -ComputerName * -Configurationame *

This means that everyone has access to every reachable domain member computer with the default configuration, which is dangerous in a productive environment.

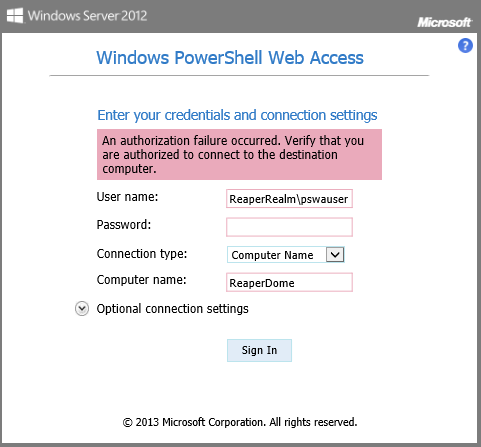
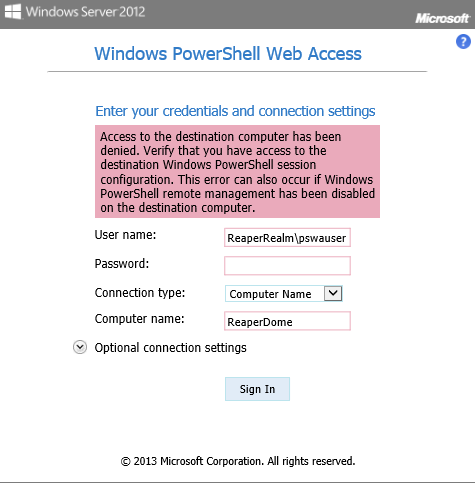
Let’s create a user for this webapp: net user pswauser Start!123 /add, by this the user will be the member of the domain users. Let’s create a custom rule for that user which allows it to reach the domain controller. Befor the authorization happens we should see the following errror.

pswa2

Add-PswaAuthorizationRule -UserName ReaperRealm\pswauser -ComputerName ReaperDome.ReaperRealm.com -ConfigurationName *

After this let’s check if we can login to the site.

pswa3

Oh boy, something is still not good 😦 So currently we have authorization for the machine yet something is preventing us from creating the session. According to the error message we already have authorization to access the machine, however the machine itself refuses this session because only the gateway knows we are allowed, the machine itsefl has to know it too.

First to resolve this use the following command: Enable-Psremoting -Force

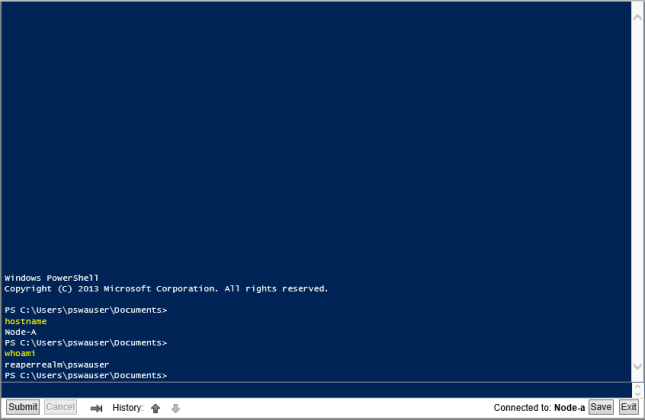
Then we have to add the pswauser to the Remote Management Users group, then try to login.

pswa4

Here we go 🙂 so basically this is how we set it up to work! I have another machine called “Node-A” In a nutshell here is how I authorize the user to access the machine:

  1. Add-PswaAuthorizationRule -UserName ReaperRealm\pswauser -ComputerName Node-A.ReaperRealm.com -ConfigurationName *
  2. On the machine: “Enable-PSremoting -force”
  3. Add the “ReaperRealm\pswauser” to the “Remote Management Users” group.

pswa5

Hope you liked it if you read it through so far. As you  can see the “Remote Management Users” membership is not good for so much but a demonstation and some basic commands, I just wanted to show you the basic concepts of this awesomeness 🙂 you can always imbue your sessions with specially crafted session configurations and additional memberships for the users.

Cheers,
Daniel

 
Leave a comment

Posted by on August 14, 2015 in Uncategorized


Working with the Windows registry from many perspectives.

Lately I have spent many time looking for ways to modify specific registry settings on different windows platfroms. I tried to collect the surprisingly many ways it can be achieved. It saves a lot of time and it’s a real geekgasm to see it work flawlessly against many machines.

First shot was the most simple with the most documentation which can be easily found.

REG /?

This can be used on with ease on most of the older platforms, like 2008, 2003 etc. For example if I wanted to delete the default NTP server key from the registry I could use the following command,
reg delete hklm\system\ControlSet001\services\w32time\parameters /v ntpserver /f
I could use this command to set the NT5DS key of the same service,

reg add hklm\system\ControlSet001\services\w32time\parameters /v Type /t REG_SZ /d NT5DS /f

I could use the reg query command to swim across the ocean of keys living under the hood of Windows.

The next method comes from the Powershell itself. The Powershell is a must have tool for every single sysadmin if the efficiency has any meaning. Let’s query the CrashDumpEnabled key to see which dump we recieve in case of BSOD.

Get-ItemProperty -Path HKLM:\SYSTEM\CurrentControlSet\Control\CrashControl
                           -Name CrashDumpEnabled

For me this key has the value: 2, which means the Kernel Memory Dump is set. Let’s change it to Small Memory Dump with the following command.

New-ItemProperty -Path HKLM:\SYSTEM\CurrentControlSet\Control\CrashControl
                            -Name CrashDumpEnabled -Value 3 -Force

If a key exsist  it will require the “-Force” swith to overwrite it. I can use the Get-Childitem to query the keys.
This is all nice and shiny, but these commands only work locally. If I want to go remotely I user the “psexec” and wrap the “reg add” command inside it with the needed value. If I want to go remotely with the Powershell version I can use the “Invoke-Command”  and specify the above in the “-ScriptBlock {}“.

Here is 1 alternative way we can edit the registry remotely, this is the StdRegProv class of WMI, you can read more on the following link: https://msdn.microsoft.com/en-us/library/aa393664(v=vs.85).aspx This has a tricky syntax.

Here are the main hives as reference:

  1. HKEY_CLASSES_ROOT (2147483648 (0x80000000))
  2. HKEY_CURRENT_USER (2147483649 (0x80000001))
  3. HKEY_LOCAL_MACHINE (2147483650 (0x80000002))
  4. HKEY_USERS (2147483651 (0x80000003))
  5. HKEY_CURRENT_CONFIG (2147483653 (0x80000005))
  6. HKEY_DYN_DATA (2147483654 (0x80000006))

First we have to define the hive.

$HKLM = [UInt32] “0x80000002”

Then the name of the computer:

$computer = “Reaper”

Then we create an instance of the class:

$registry = [WMIClass] “\\$computer\root\default:StdRegProv”

Let’s query the Crash Dump settings,

$registry.GetDWORDValue(“0x80000002”,
“SYSTEM\CurrentControlSet\Control\CrashControl”,”CrashDumpEnabled”)

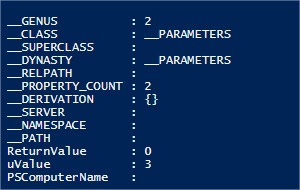
For this we recieve something like this as output.

Edit Draft — WordPress.com - Google Chrome

From the return value we see that the query was successfull, and the “uValue” shows the actual value returned, which translates into “Small Memory Dump” In order to change the value we have to specify the value corresponding to the proper type in which can be accepted by the key.

$registry.SetDWORDValue(“0x80000002”,
“SYSTEM\CurrentControlSet\Control\CrashControl”,”CrashDumpEnabled”,”0x00000003″)

Here the return value is the key also, if this is 0 we were successfull. It’s necessary to use the corresponding functions to the types of key we want to modify/query etc… Here on you can read more:https://msdn.microsoft.com/en-us/library/aa393664(v=vs.85).aspx

This means if we want to modify the value of a DWORD we have to user the SetDWORDValue function, if we want to query a Multistring key we have to use the GetMultiStringValue function.

Cheers,

Daniel

 
Leave a comment

Posted by on July 10, 2015 in Uncategorized


Kernel Virtual Machine alias KVM on Ubuntu Desktop 15.04

I have recently had some fun with KVM and I thought I would share with you my experiences. So basically a few years ago at the beginning of the University, my Programming teacher made me love the Linux and the Open Source community. It was really good to see people sharing their stuff/programs/etc for free, and nevertheless the greater good. At that time I took a dive into virtualization and since I had not much Idea, other than VirtualBox I thought to myself, I can possibly find something else. There I was looking at the how-tos of the KVM. At first it seemed to me a bit too geeky from all the command line stuff, but later I learned the power and the freedom that comes with the shell 🙂 Now I have a Ubuntu 15.04 (i386) installed on my laptop because it’s a bit old one(HP 6930p), but It has some power in it to run 2-3 KVM machines paralell. In order to install the necessary packages we have to run the following commands in the shell, behold we need root access to install the packages.

sudo su

After this we enter our root password

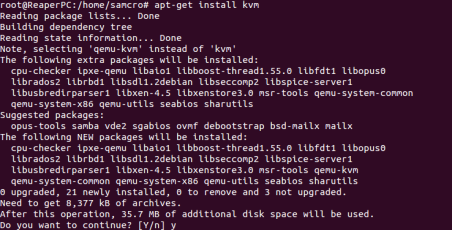
apt-get install kvm

These will select the necessary dependency packages, and install them. Until it’s done we can have a coffee or tea or whatever.

KVMinstallAfter the installation we should create a folder for our KVM platform, I have created it on my user’s Desktop with the following structure. I have 1 folder where the images will be stored, and another where my start scripts will be held.

structureIn order to install a virtual machine we have to create and “image” file which is similar to the “vhd/vhdx” or the Hyper-V(Microsoft) or the “vmdk” of the VMware platforms. This is the realm of the virtual machine. We can create one with the following command.

qemu-img create <NameOfTheImage.img> -f qcow2 <Size>

Here is how I created a 10G image for my Ubuntu Server.

qemu-img create UbuntuServer32bit.img -f qcow2 10G

Now all we have to do to grab an ISO from the Ubuntu site, download it and install the Operating System to play with.

http://www.ubuntu.com/download/server

In the previous command after the “-f” I have used the “qcow2” because “QEMU image format, the most versatile format…”, check the manual page for relevant informations.

So after we have downloaded the ISO all we have to do is specify the KVM to boot from the ISO and work with the previously created image file.

kvm
    -smp 2
    -m 1024
    -boot d
    -cdrom /home/samcro/Downloads/ubuntu-14.04.2-server-amd64.iso
    -hda ./images/UbuntuServer32bit.img

I broke it down so it’s easier to read, the “kvm” tell’s the shell to start an insance of the virtualization, the “-smp 2” tells it to have 2 vCPU, the “-m 1024” means I have assigned 1GB of memory to it “-boot d” makes it boot from cdom, the “-cdrom …” specifies the path to the ISO, and the “-hda” specifies the path to the image.

UbuseroBasically now all we have to do is go through the configuration steps and install the server as we want it. When it’s done we can create a basic startup script so we don”t have to type always so much to get the server started. Here is how my start script looks like. I have navigated into the “osscripts” folder.

touch StartUbuntuServer32bit

With the above command I have created the file which will hold the following command.

kvm -smp 2 -m 1024 ../images/UbuntuServer32bit.img

This is a bit simplier, however it’s quite functional. We can use “nano” or “gedit” to add these lines to the file! In the end we have to make sure we set the “executable” flag on our file so we can run it.

chmod +x StartUbuntuServer32bit

With this we set the flag, and if we paid attention we can see that the color of the file has changed to green.

chmodIf we did not make a typo I believe the following should appear after we give the “./StartUbuntuServer32bit” command to our shell.

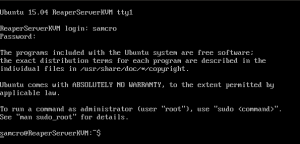
Server
There are many ways to fine-tune the kvm, with lots of switches, and other demand specific features. In the future if I will show you a little bit more easier way to manage the virtual machines running on this platform with the help of the “virt-manager”, which is a graphical tool for this very purpose.

Cheers,
Daniel

 
Leave a comment

Posted by on June 17, 2015 in Uncategorized


Using VPCS for testing RIP version 2 in GNS3

This post is about VPCS and RIP version 2 configuration in a very small environment. Not the topology rather the small cost yet robust testing possiblity is the important thing here.

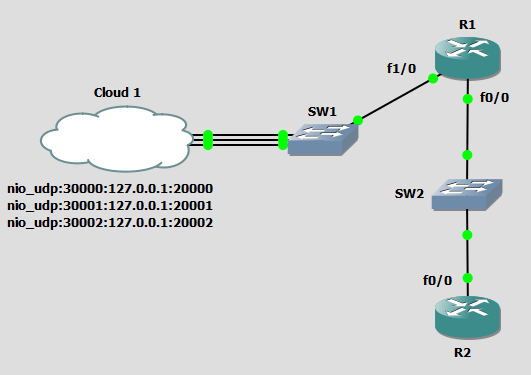
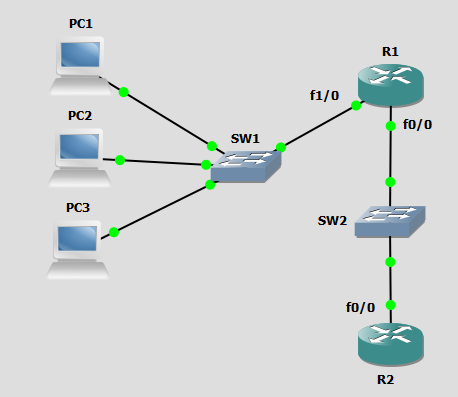
Here is an overview of my topology.

Topology

The routers have these basic configurations.

R1:

  • router rip
  • version 2
  • network 10.0.0.0
  • network 192.168.0.0
  • interface FastEthernet0/0
  • ip address 192.168.0.150 255.255.255.0
  • interface FastEthernet1/0
  • ip address 10.1.1.1 255.255.255.0

R2:

  • router rip
  • version 2
  • network 2.0.0.0
  • network 192.168.0.0
  • interface Loopback1
  • ip address 2.2.2.2 255.255.255.255
  • interface FastEthernet0/0
  • ip address 192.168.0.151 255.255.255.0

This is all we need because this way we have a loopback at the very end of our network which we can try to reach from the virtual machines. Let’s get back to the VPCS, these are small “programs” accompanying the GNS3 and are only exsisting for the very purpose to simulate the behaviour of a PC from network perspective. We can either add them as a VPCS from GNS3 with GUI or we can use their executable from the original installation directory. Mine looks like the one below.

VPCS

If we start the executable we get a prompt like this.

VPCS

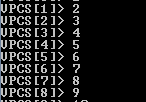
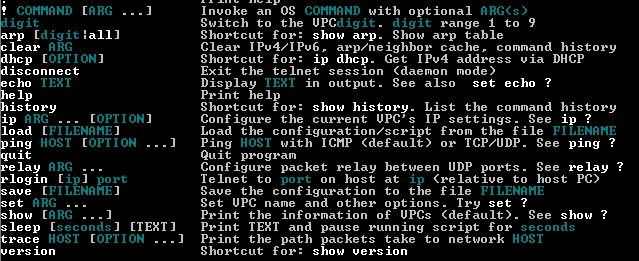
At the end of the prompt we see this.VPCSAs you can see with the numbers from 1 to 9 we can switch between the virtual pc-s, and use them as we like, configure them with IP addresses, and telnet from them or whatever we want. Here is a list of what we can do with these machines.

VPCS

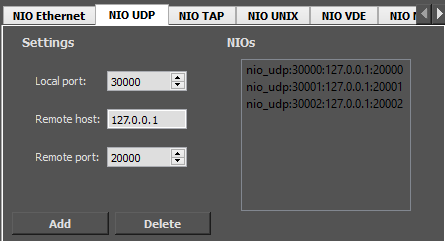
But how does this go and connect to the Cloud in the GNS3? If we go and take a closer look at the Cloud we can see we have an NIO_UDP ear of the configuration tab.

VPCS

I have added 2 ports now here is a screenshot from my configured VPCS which was brought to you by the “show” command. 🙂

VPCS

We can see that the Cloud’s Remote port corresponds to the VPCS Local port, and the Cloud’s Local Port corresponds to the VPCS Remote port(RHOST:PORT). Currently I have the R1 set as default gateway on these VPCS and according to the routing table of the router:

VPCS

I must be able to ping any device from any device in my environment!

VPCS(2) -> R2(Loopback1)

VPCS

Now let’s try to ping the VPCS(3) from the Loopback1 interface of the R2 router!

VPCS

The first packet is lost due to ARP but after that it goes very smooth.

This is the same topology, only the difference is that each VPCS now has it’s own console where we can not switch to the other. I belive the previous version I have showed is more efficient in many ways. But you know what they say, dealer’s choice. 🙂

Topology

I know the latency is pretty high but considering that I am running an emulated router using a virtualized network which is ran by the GNS3’s hypervisor in a Virtual Machine running on the back of the VMware Workstation’s hypervisor I think it’s not just amazing but pretty awesome. 🙂

Cheers,
Daniel
 
Leave a comment

Posted by on April 3, 2015 in Uncategorized